Pages

Wednesday 31 March 2010

Goo!

Next step for the "Corked" Project is making a gooey chilly liquid. So far I only had to play around with it, so I didn't go crazy on the settings. Just tried to make it quite viscose and sticky, as it has to stick to the bars of the cell eventually.
Here's a little test render!
I used Maya nParticles with the nucleus solver. I really like this solver it's really easy to use and it's the first time that Maya comes close the results you get in RealFlow. As I said before I didn't put high values for the settings, so the mesh is quite rough and you can clearly see the particle shapes. Those problems will be solved when I get to do the real one, but there's one problem I haven'tthought about before and I only realised now. The bump map attached to the mesh stays in 3D space so while the particles fly through the air, the map stands still. You can't probably see that because of the bad quality of the render, but it is noticeable. I have no idea how to fix that right now, but I'll find a way!

Saturday 27 March 2010

Car rig

I did this over summer last year. I actually build a simple car rig in Maya with the main focus on terrain reaction. It took me 2 weeks, a lot of tutorials, readings and red bulls, but I got it at the end. The problem was that the simulation took so long that I couldn't proper test it. I found the already build suspension rig in Real Flow a week later and used that one instead. The whole procedure only took me 2 hours. I still learnt quite a bit about rigging and scripting though. Unfortunately I can't show any of this stuff cause I accidentally wrote over the scene with the Real Flow scene.


sorry about the crappy quality. I'm working on it.

Rope Texture

Besides the lighting I also had to create a texture for the ropes in the scene. Andy suggested the rope texture tutorial on http://www.cgtextures.com/. In this tutorial you basically build the texture by lining up a bunch of low poly cylinders in a circle then twist them, combine them into one mesh and duplicate them a few times. I created a low poly plane and put it underneath the rope mesh, then baked a normal map, a shaded map and an ambient occlusion map from the rope mesh onto the plane. To get a good result you have to increase the sample size and the resolution which also increases the time it takes Maya to transfer those maps immensely. It took 2 hours to create those three maps (2048 square resolution, highest sampling rate and 500 sampling size for the ambient occlusion)

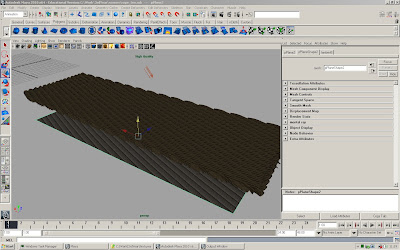
A screenshot of the rope mesh with the normal map already transferred onto the poly plane
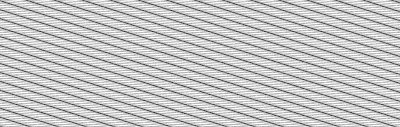
The shaded map.
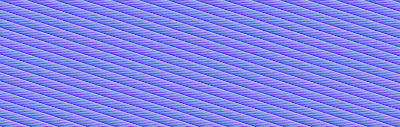
The ambient occlusion map
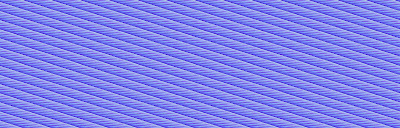
And the normal map

After Maya finished the transfer mapping I could import those textures into Photoshop to create the final texture. The main thing is making the texture seamlessly tillable. I also multiplied the ambient occlusion map with the shaded map. It's important that all the changes on the shaded map match up with the normal map otherwise they wont fit together anymore.

This is the finished rope texture. Seamlessly tillable and with a bit of colour variation to make it look less dull.
The finished normal map. Also seamlessly tillable and matched up with the rope texture.
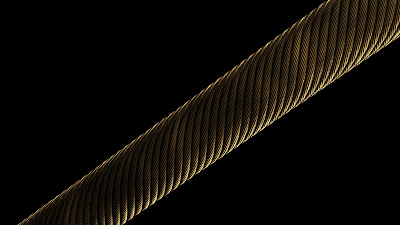
A little test in Maya. Both textures applied to a low poly cylinder.
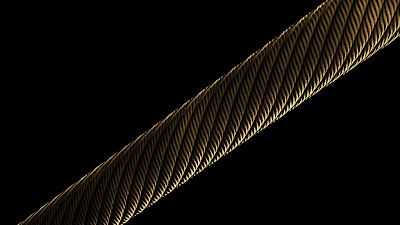
This is probably as close as you can get without losing any information.
(click on images to enlarge)
I didn't know that this procedure takes so long, but I think the result was worth all the waiting.

Friday 26 March 2010

Little tip for fog lights in MentalRay

The procedure of creating fog lights in Mental Ray:
  1. create your light (point or spot light, even though it works with volume lights as well, but I never tried it, not a big fan of volume lights!)
  2. create the fog light (under Light Effects)
  3. scale the cone (spot light) or the radius (point light) of the light to the desired length of the light rays. -Don't worry about intensity and colour for now-
  4. create a Mental Ray light shader. Go down in the attribute editor of the light to mental ray, open the attributes in the folder, go further down to custom shader and click on the checker board next to Light Shader, choose either mib_light_spot (spot lights) or mib_light_point (point light) to create a Mental Ray light shader.
  5. in the attribute editor go the sphereShape node (point light) or the coneShape node (spot light) and check the box Volume Sample Override in the Render Stats section. Give Volume Samples a higher number, but beware that it increases render time so leave it low for playing with the settings and crank it up for the final render. 50 is good for the start.
  6. now play around with the settings in Mental Ray Light Shader and the Fog Light. Don't worry about any settings on the original light (like intensity and colour) cause the Mental Ray Light Shader completly overrides all those attributes!

Another little tip to speed up the process of linking lights to objects:

  1. select the light
  2. change the menu set to rendering
  3. go Lighting/Shading> Select objects illuminated by light. That selects all the objects in the scene, as the light so far lights all the objects. It deselects the light though.
  4. shift select the light again
  5. go Lighting/Shading> Break light links. Now the light doesn't light any objects
  6. select the light again and shift select the objects you want it to illuminate.
  7. go Lighting/Shading> Make light links. And that's it. The light will now only illuminate those objects
If you make those commands into custom shelve buttons you can create complex object based lighting sets within minutes without going through the tedious process of light linking in the Light Linking Relationship Editor.


And more lighting!

Andy's ship is coming along nicely and I now have the ship modelled to play around with the lights a bit more. It's as always a struggle as Mental Ray has it's own little ways of doing things. Because the scene has a lot of candle lights and foggy moon lights I thought I could use fog lights which work quite nice in Maya Software Render but to get it right in Mental Ray you have to do a lot more stuff. Another thing is that I wanted to include some glowing lights to the scene. While it's really quite simple to click a little button in Maya that says Light Glow and then create the Optical FX with glows, halos and lens flares, it doesn't work in Mental Ray. So after hours of searching the internet for answers and not getting any, I figured I could try to make an object glow and use that. So I created a little NURBS sphere and assigned a blinn to it with sharp specular attributes and turned the special effect glow on. And it works in Mental Ray!
Here are some more test renders (click on the images to see larger version).

You can see the different light elements of lanterns. A point light that illuminates the scene, another point light, with a mental ray shader and fog light assigned to it to get the light rays and the glowing NURBS sphere!
Here is where the glow is working.
There's clearly too much glow on some of the pictures, but that is mainly because all the metals in the scene have the same material assigned, so they all have the same glow. Once the texturing of the props is done this problem is solved.

Again too much glow.


Sunday 21 March 2010

Kind of finished


It's the "finished" version. Well it's what we handed in. It's only two out of 5 shots and it's not really how we wanted it to look. The roto mask on the first shot "eats" into Oddnes face-I have no idea why it looked fine on earlier renders. The main problem on the second shot is that we forgot to change our footage from 50 to 25 frames/sec. That's why the gun moves in realtime speed and me and Oddne move in slow motion. The bridge also isn't really colour corrected and looks therefore out of place. We didn't have enough time to render the other scenes and fix the problems,but I will finish this project during the easter break.

Tuesday 16 March 2010

Lighting


Our project is to help the 3rd years with their final project. I got assigned to Andy's "Corked" project. http://andyfossey.blogspot.com/ he updates his blog pretty frequently (unlike me).
My first job is to light the scene. I got a rough set with rough textures. Andy's idea is to keep the set pretty dark with only candles and moonlight illuminating the set.
Those are the first renders of the the cage where a lot of the action is happening. I still gotta do the rest of the set, but Andy seemed pretty happy with what I've done so far so I'm just gonna keep on doing what I'm doing.

PS: click on the images to get a larger version. They're not really hi res but it gets a bit bigger.

Thursday 11 March 2010

First Shadow Test

Well there's obviously more work to be done. But I thought I check the shadows I created. This is all done by extracting the mattes and setting them up in Toxiks Reaction node so they look like shadows.

Sunday 7 March 2010

Masters of Visual Effects for free!

With two projects in the pipeline and the hand in date for my VFX project this friday. I really don't have time to put some elaborate entry on my blog. But I have to make people aware of this little gem. Everyone who's just remotely interested in visual effects should check it out. And don't worry it's not illegal cause the videos are not available anymore and the guy who uploaded it (Matt Silverman) was actually involved in the production (he might've even been the producer- not sure). I'm still not sure how long this is going to be on there, so watch it as soon as possible. Although vimeo clips can usually be downloaded, he didn't allow to download those clips either, which sucks a bit.