Pages

Thursday 25 February 2010

Lighting Screenshots

I fought with lighting and perspective for the first shot again.

I created a different render layer with a material override to see the shadows better.

This is the a render of the master layer. Obviously no shadows on the ground because it's a projected matte painting and the surface shader won't receive any any lighting or shadows.

Tuesday 23 February 2010

Problems, problems, problems (Part4)

3 weeks to go till hand in day. We mainly did tests in the first couple of weeks which was a good move in retrospective considering the amount of problems we had (hence the title of this entry). It should go smoother from now on.
One the most difficult shots we had planned involved 3d tracking. Since Maya 2010 comes with MatchMover we decided to use it for 3D motion tracking of a green box which will later be replaced with a CG gun. Oddne built a huge box out of wood and painted it green with car paint. To see his progress check out his blog http://oddne.blogspot.com/.
The box is quite heavy and like I said quite big. To handle it is difficult and that is a good thing since it will be replaced with a huge bulky metal gun. When it comes to shooting the scene we don't have to worry about acting like the gun is heavy.
We put massive crosses with black duck tape on all surfaces of the box for tracking markers and shot some test footage.


First of all you can see that we didn't use a tripod and a hand-held camera shot is really not good for this procedure. It's not impossible but you would have to track the environment as well which is especially in this case unnecessary work. I realised pretty soon after putting the footage into MatchMover that the crosses are far to big. MatchMover only needs contrast between pixels. The bigger the markers the more likely it is that the track jumps within the the massive amount of black, it just won't see a pattern any more but a big black surface. Then I realised that the tape is quite reflective so whenever it turns to where the light hits it it becomes white. That obviously isn't good for the tracking software which searches for colour differences between pixels so the tracking makers really shouldn't change colours. The main problem though is that I haven't used a 3D tracker before neither have my team mates nor any of my class mates for that matter. Although Georg has used 3D tracking software before he never used MatchMover. So I went home and did all the tutorials I could find and read the manual. Unfortunately there isn't much about 3d motion tracking in the manual or online. 3D tracking software is mainly used to imitate a camera track. The manual had a section about tracking moving objects so I followed that route. It says I would have to make a mask over the moving objects (in this case me and the box) then auto track the environment, invert the mask to only track the moving object(in this case only the box) and track this information into a different group. After a couple of tries I managed to solve the 3D camera, but the points where far from accurate. Frustrated and tired I returned to uni on the next day only to find out that Georg found an easy way to track objects by importing a mesh into the scene and attach its vertices to a tracking point. I tried it and it didn't work but only because I couldn't track enough points to solve a camera. All in all I would say that this test footage is absolutely useless. But I guess that's what test footage is for. I did pretty much every mistakes you could do when preparing a shot for 3D tracking, but at least I know better now.
So when the day of the shooting came I measured the box, built the exact replica in Maya with a few more divisions on each face evenly spread and measured the distance between each vertices to tape tiny squares of insulation tape(smaller and less reflective than duck tape!)to the right place onto the box.


That is the shot we're going to use. I'm going to talk about the experience of the green screen shoot in another entry. The footage looked alright but I still wasn't looking forward tracking it. I haven't exactly had a successful solve yet and the amount of hours that go with it making the whole tracking experience a rather unpleasant matter.
I locked myself in my room (not literally) for the night with a few energy drinks and a big pouch of tobacco. 5 hours later, all the energy drinks gone and my tiny room stinking of fags, I had 45 hand tracked points. While waiting for the solve to finish I tried to think of ways to still make the shot if it doesn't work (which I was expecting). Once it finished I changed to the 3D view to check the mess I just made and I saw this...
IT WORKS!
Ok there is a little glitch when he picks it up, but that can be easily be fixed in Maya.
It was 3am by then and I had to get up at 7 to go to but it was so worth it.
I had to wait until after the weekend to show Oddne, Simon and Georg my progress. We obviously then had to try how it looks with the CG gun on top of it so I exported the the MatchMover scene into Maya and parented the gun to the locators and after a bit of tweaking I got that!

Here is the MatchMover scene in Maya. The 3D tracking points have been exported as locators.

And this is a rough version of the gun parented to those locators.

I think it looks quite good already. I will have to tweak the position of the gun a bit and get rid of those twitches by baking the keyframes and then manually correct them, but I think we're onto something good here.
Unfortunately there is a part 5 of my "Problems, problems, problems" blog series. This time it's the empty bullet shelves flying out of the gun using particles and instancers.

Monday 22 February 2010

Problems, problems, problems (Part3)

I already explained in an earlier entry that we're going to use a 3D element as a mid ground element for the matte painting since it looks kind of empty. Oddne was busy building a bridge which will eventually be duplicated so we have it on both sides. In the far distance one of the bridges will overlap the other, but to make it a bit more interesting I decided to collapse them on top of each other. Maya Shatter Effect seemed perfect for that, but I had no idea that this little inbuilt gimmick has so many flaws.
It seems pretty simple. I thought I would just take the parts of the bridge (built with polygons as required) I wanted to be shattered and apply the Solid Shatter option with a bit of jagged edges and a separate interior material.
First thing I noticed you can't really go high in numbers for the shards count, Maya or rather my PC and the PC's at uni really struggle. But that shouldn't be much of a problem just shatter it with a low number shard counts first then shatter the bigger pieces again. Well... that doesn't work!
For some reason the Shatter Effect does not work on already shattered pieces. I figured out that this is because of a little conflict between the shaders. It only works if you don't have any shaders on the geometry applied in the first place (so Maya uses the Initial Shader Group) and you turned of apply interior material in Shatter Effect option box. That is not really useful at all because it's really hard to texture the pieces afterwards. Georg then showed me some shatter scripts written by some clever people and put on the internet to use for free for stupid people like me. I tried a few scripts from http://www.creativecrash.com/. Even though most of them don't have an issue with reshattering (don't know if that word actually exists) but they either don't have an jagged edge option so it just cuts the geometry in perfect straight lines or they don't have the option of applying an interior material. I ended up using a script called Ax Crack (http://www.axelgaertner.de/axcrack/) written by a German compositor (I don't know how I always end up talking about Germans or Germany on my blog). That script had it all. Only downside is that it is a bit confusing and it seems like the guy himself doesn't quite know how the script really works. I think it even says on the very minimalistic instruction page that you should try out all the options and see which one looks best, that isn't really an ideal notion considering that Maya crashes every time you try to undo a the shattering because of a known problem with Maya's boolean operation. It is a very nice script though and I'm glad that he shared it with the world!
After I shattered all the pieces, I converted them into rigid bodies and applied some forces to them. I did it rather step by step then collapse them all in one go ensure that Maya doesn't crash.

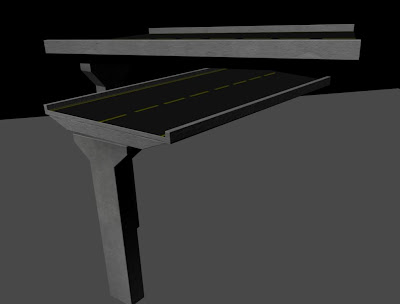
The original geometry before the shatter script applied.

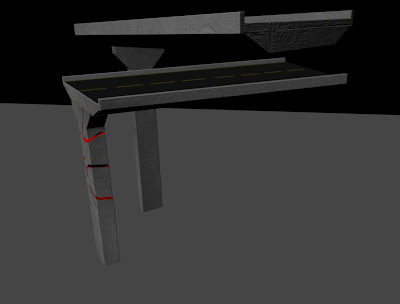
First pillar shattered with an offset to avoid interpenetration between the shattered pieces.

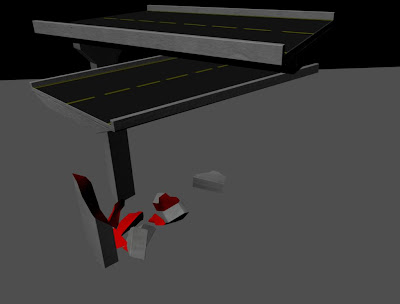
Pillar pieces shattered on the floor. I left one big piece standing ( as a passive rigid body) so it looks like it's naturally collapsed. After the simulation is over and all the pieces are settled on the floor I set their position as an initial state an turned them into passive rigid bodies with collision on.
The top bit collapsed. Because the shattered pieces of the pillar aren't active any more they won't move, but with collision left on they still interact with the active rigid bodies of the bridge top. The red material is the interior material automatically applied by the script.

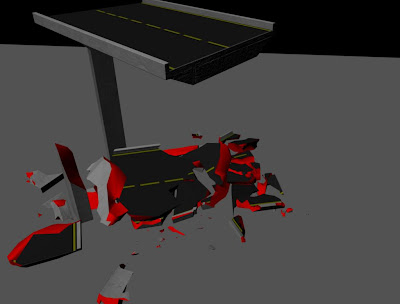
All geometry shattered. I used quite high numbers for the step size in the rigid body solver attribute menu to make the simulation go quicker. After all it's not important that the simulation looks real, since you don't see it at the end. Whenever a piece looked out of place or wouldn't settle on the ground I positioned it by hand by turning on the " allow disconnection" in the rigid solver and then breaking the connection for the individual piece.
Shattered pieces with texture and a bit of bump mapping. I didn't really worry to much about the texture it's going to be too far away to notice.

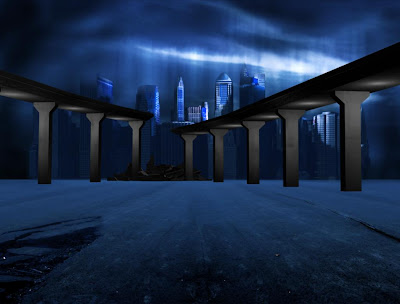
Finished and imported into the scene with provisional lighting.

Monday 15 February 2010

My Inspiration!

I went on my fellow students blog's and a lot of them showing and talking about films and animation that inspire them. I think I should do that. Obviously my heroes aren't directors or animators but compositors and vfx artist! I probably watched about 200 demo reels and vfx breakdowns in the last 1 and half years and I gotta say whenever I see an amazing shot being torn to pieces from green screen footage to to the small fog and dust elements I actually get that little buzz, that probably made me want to become a vfx artist (funny enough I actually entered the course with the intention of becoming a 2D animator). When I find a good demo reel of an relatively unknown compositor posted somewhere on those vfx forums and community sides, I check their names on http://www.linkedin.com/ to see what happened to them and in most of those cases I actually find their names in big studios. That really gives me hope, that if I keep on working hard on my skills I will eventually end up with a successful career.
I found this demo reel of an Austrian compositor working in Germany for a small post production company that mainly does mediocre TV adverts. But his stuff is really good, nothing special but good and solid.
Typing his name into linked-in it turns out he got a job as a compositor at MPC in London now. I was generally happy for him.
Now VFX breakdowns of films are just amazing. But it's not so much the big VFX shots that impress me that much. The subtle unnoticeable shots are so much more interesting. Like this Fast and Furious VFX Breakdown. http://www.traileraddict.com/trailer/fast-and-furious-2009/vfx-breakdown.
I watched the movie and quite frankly I wasn't impressed at all, but that is because of the acting and storyline. I didn't notice any matte paintings though, which is the best compliment to the compositors and matte painters. If their work gets by unnoticed it means they did a good job.


My favourite one is from the movie Hancock with Will Smith. I liked the movie but that last scene, where he jumps of the building into the city was just brilliant and luckily I found a breakdown on you tube. The transition from Will Smith to a 3D character is seamless. I borrowed the DVD and watched it frame by frame with my nose press on the monitor and I still couldn't tell when it happened. Plus the environment work with the 2d Matte Paintings and the 3D environments is pretty impressive too.


Dan Schick is a compositor working on a show called Supernatural. Even though I've heard of it I've never watched it but his show reel makes me want to watch it. The impressive thing is that he works for a TV Show which means less time and probably less budget. He still managed to come up with some really good shots. Especially the one where one character walks into another and they turn into liquids. In movies there would've been an awful lot of artists working on making the whole character 3d(probably motion capture) so they can use dynamic simulation software like Real Flow to do the splash. In this case he just used a lot of layers of waters splashes (ok one layer is 3d) and composite them together and I think it looks pretty good.

Problems, problems, problems (Part2)

Okay the Matte Painting is done, the CG bridge is in building state it seems like everything's cool. Let's just do a camera projection of the Matte Painting to give it some depth! Nothing can go wrong there, I've done it quite a few times in After Effects without any problems, well this time I'm using Maya, but that should only make it easier! WRONG!!!
Setting up the projection camera and the image plane is fairly simple. Shading the objects (simple polygon planes in this case) on the other hand isn't. Because the painting is already lit you don't want the material to receive any kind of lights or shadows and the surface shader is therefore perfect for this scenario. Unfortunately the out transparency node on surface shaders doesn't work with projections! And that is not just me being young and stupid and inexperienced my 3d and CGI tutor Georg was just as baffled as me. I found a relatively good and easy solution, but it only works when rendering in Maya Software. By plugging the projection node straight into the surface material node of the shading engine you can avoid making a material but still get the projection onto the geometry. No lights, no shadows, just the plain projection with an alpha channel (just make sure you only project everything once, so turn projection off when you assign the alpha file to the out transparency!) . Only downside as I said earlier you can't render it in Mental Ray because of a really weird (but kind of cool) red glow around the edges. Apparently it's Mental Ray's way of warning you that you don't have any materials assigned(DUH!) Another way of doing it (I have to give mighty George Finch full credit for this!) using a ramp shader instead. Just plug the projection file as a projection into the colour node and the alpha file into transparency, turn off all the light and reflection related attributes and it's done. It works with transparency and in Mental Ray. Hey! Another day of excessive swearing and frustrated any-object-nearby-throwing fun over! But there is more to come when Problems, problems, problems continues for part 3.

Problems, problems, problems (Part1)

First of all we have a new addition to our team. Simon Carter is going to be the producer and the sound designer. It's good to have someone on the team who's more sober-minded. Me and Oddne get kind of carried away at times.
As the title says the last two weeks have been literally just about problem solving. Luckily we weren't so naive to think that everything we had planned would turn out fine just by plain doing it. We're trying a lot of stuff we haven't done before, including the use of software we haven't really used before. The first little problem was my initial Matte Painting (the one I did on the last blog entry). I guess I was just starring at it for too long to not realize that it had a lot of flaws. Some elements (particularly the bridge) didn't quite look like they'd actually belong into the scene. The lighting was not well thought through and it all looked a bit packed. So I went home (crying!!! No not really) and did a new one. This time less complicated but better!!! So I just got a nice sky picture, a simple floor texture and a solid block of buildings from a city. I figured since there's only a tiny amount of movement of the camera there aren't any parallax issues to consider plus the buildings would be too far away.

The floor ground is made out of two ground pictures plus the two cracks. I added lots of masks and adjustment layers to each element to get the right result. To match the lighting of the building to the sky I actually had to relit the buildings in Photoshop.
Here is the original picture of the buildings with the original lighting. Notice the difference!

After showing my team mates the new Matte Painting I got the reaction I wanted. We then decided to keep the idea of a decayed bridge as a fore/mid ground element, but we're going to build it in 3D to have more control over it.